Showing posts with label Blogger Tricks. Show all posts

Christmas snowfalls with breeze for Blogger 2012

/ Monday, December 17, 2012 /
Christmas snowfalls with breeze for Blogger 2012
Christmas is one of the largest festival celebrate all over the world. Christmas is the much awaited festival that knock the door of all Bloggers. And all are thinking about decorating their blog. How to decorate the blog with snowfalls and clouds ? Do you like to decorate your blog with beautiful snowflakes and clouds? Then here there is a article about how to add snowflakes with breeze to your blogger blog.

If your Blog has a dark interface then this widget serves better.The Snow flakes and the breeze are  in white color so dark background will be better to get a good look.


If you want to get dark Christmas background ,set the following picture or search darker Christmas backgrounds.
Do you want to know how this work
Click below to view the demo


/*-- Breeze for Snow flakes --*/
#mbl_snowflakes {
position: absolute;
height: 950px;
width: 966px;
overflow: hidden;

}
#snowContainer > div
{
position: absolute;
width: auto;
height: auto;
-webkit-animation-iteration-count: infinite, infinite;
-webkit-animation-direction: normal, normal;
-webkit-animation-timing-function: linear, ease-in;
}
#snowContainer > div > img {
position: absolute;
width: auto;
height: auto;
-webkit-animation-iteration-count: infinite;
-webkit-animation-direction: alternate;
-webkit-animation-timing-function: ease-in-out;
-webkit-transform-origin: 50% -100%;
}
@-webkit-keyframes fade
{
0% { opacity: 1; }
95% { opacity: 1; }
100% { opacity: 0; }
}

@-webkit-keyframes drop
{
0% { -webkit-transform: translate(0px, -50px); }
100% { -webkit-transform: translate(0px, 650px); }
}
@-webkit-keyframes clockwiseSpin
{
0% { -webkit-transform: rotate(-50deg); }
100% { -webkit-transform: rotate(50deg); }
}


@-webkit-keyframes counterclockwiseSpinAndFlip
{
0% { -webkit-transform: scale(-1, 1) rotate(50deg); }
100% { -webkit-transform: scale(-1, 1) rotate(-50deg); }
}

  •  Search <body and copy the following below it
<script charset="utf-8" src="https://netoopscodes.googlecode.com/svn/branches/Js files/snowfall.js" type="text/javascript"></script>

<div id="mbl_snowflakes">

<div id="snowContainer">

</div>

</div>


  • You are done... Save the Template

How to Change comments style on Blogger?

/ Tuesday, November 20, 2012 /
Style your Comments Block Blogger
First of all i'm saying sorry to all for the delay of posting.
This is a tutorial about how to style your comments block with effective designs.
This is done using Simple css Scripts.
The demo of a styled comments block is as follows.


Click the link below to see demo
Demo page
What's inside this article?

Comments Style version 1.0


.comments .comment .comment-actions a {
background: none repeat scroll 0 0 #FFD99E;
border: 2px solid #FFB43D;
border-radius: 3px 3px 3px 3px;
color: #000000;
font: bold 12px arial;
margin-right: 14px;
padding: 3px 9px;
text-decoration: none !important;
text-shadow: 1px 1px 0 #FFFFFF;

}

.comments .comment-block {

background: none repeat scroll 0 0 #E2E2E2;
border: 4px solid #ABABAB;
border-radius: 3px 3px 3px 3px;
padding: 3px 10px;

}

.continue a {
background: none repeat scroll 0 0 #FFD99E;
border: 2px solid #FFB43D;
border-radius: 3px 3px 3px 3px;
color: #000000 !important;
display: inline-block !important;
margin-top: 7px;
padding: 3px 8px !important;
text-decoration: none !important;
text-shadow: 1px 1px 0 #FFFFFF;
}
.comment-block:hover > .comment-header {
border-bottom: 2px solid #000;
-moz-transition: border-color .5s ease;

}

.comment-header a {

color: #000000 !important;

}

#comments .avatar-image-container img {
border: 2px solid #FFFFFF !important;
border-radius: 50px 50px 50px 50px;
height: 57px;
max-width: 57px;

}

.comments .avatar-image-container {
border: 2px solid #FFFFFF;
border-radius: 34px 34px 34px 34px;
box-shadow: 1px 1px 3px #ABABAB;
float: left;
margin-left: -40px;
max-height: 60px !important;
overflow: hidden;
width: 60px !important;
}

Comments Style version 2.0


.comments .comment-block {
background: url("https://blogger.googleusercontent.com/img/b/R29vZ2xl/AVvXsEhmMu_g9LHhD4z6H1cBIHu4h54NV28BykpEj92zYpOP4KGV1voqDyTMEqk_1rKsu8AKFnCvWu5S-mnSiDHofNLzyH2OTHP2KEFO6i6F-uVCkJQxMtKy7sE8OMgP9KAxt5BaicZFx402TGw/s1600/bg.png") repeat scroll 0 0 transparent;
border: 4px solid #EAEAEA;
border-radius: 3px 3px 3px 3px;
box-shadow: 3px 3px 0 #D6D6D6;
margin-left: 48px;
padding: 3px 10px;
position: relative;
}
#comments .avatar-image-container img {
border: 2px solid #FFFFFF !important;
border-radius: 50px 50px 50px 50px;
height: 57px;
max-width: 57px;
}
.comments .avatar-image-container {
border: 2px solid #FFFFFF;
border-radius: 34px 34px 34px 34px;
box-shadow: 1px 1px 3px #ABABAB;
float: left;
margin-left: -40px;
max-height: 60px !important;
overflow: hidden;
width: 60px !important;
}
.comment-header {
border-bottom: 2px solid #F1F1F1;
}
.comment-block:hover > .comment-header {
-moz-transition: border-color 0.5s ease 0s;
border-bottom: 2px solid #000000;
}
.comments .comment .comment-actions a {
background: -moz-linear-gradient(center top , #EEEEEE 0%, #CCCCCC 100%) repeat scroll 0 0 transparent;
border: 2px solid #E0E0E0;
border-radius: 3px 3px 3px 3px;
color: #000000;
font: bold 12px arial;
margin-right: 14px;
padding: 4px 11px !important;
text-decoration: none !important;
text-shadow: 1px 1px 0 #FFFFFF;
}

Protect all images in your Blog jquery trick

/ Saturday, June 9, 2012 /
Here is a most important trick every blogger need. This trick is about how to protect all your images in your blog with a transparent image covered on it. I recently posted an article about How to protect images? .This article about to protect all images.


Related Articles
How to protect images in your blog?
Do you want to see demo? Try to save picture in this blog.
----------------------------------------------------------
What's inside this article
 Step 1: Add jQuery plugin (if your blog have a jquery plugin,ignore this step)

  • Go to Template->Edit HTML [A dialog box appears click Proceed]
  • Copy and paste the below code <head> and save it
<script src='http://ajax.googleapis.com/ajax/libs/jquery/1.7.1/jquery.min.js' type='text/javascript'/>
  • Go to Blogger Account
  • Template->Edit HTML [Click Proceed]
  • Copy the code above </head>

Protect only First image in every Post

<script type='text/javascript'>
//<![CDATA[
$(function(){
$(".post-body img:nth-child(1)").after("<img src=\"http:\/\/2.bp.blogspot.com\/-lQW7QlMoz10\/T8yL_5IPF6I\/AAAAAAAAAQU\/5R8ngq17xzw\/s1600\/transparent.png\" alt=\"NetOopsblog protected image\" style=\"margin-left: -212px; opacity: 0; position: relative; top: 0;\" \/>");
});
//]]>
</script>

Protect all images in every post

<script type='text/javascript'>
//<![CDATA[
$(function(){
$(".post-body img").after("<img src=\"http:\/\/2.bp.blogspot.com\/-lQW7QlMoz10\/T8yL_5IPF6I\/AAAAAAAAAQU\/5R8ngq17xzw\/s1600\/transparent.png\" alt=\"NetOopsblog protected image\" style=\"margin-left: -212px; opacity: 0; position: relative; top: 0;\" \/>");
});
//]]>
</script>
I think you liked this article...please like and share..
 

How to Add Yahoo Smileys on Blogger Threaded Comments?

/ Friday, June 8, 2012 /
Yahoo smileys for Blogger Threaded Comments
I 'm going to say about how to add yahoo smileys to Blogger Threaded comments. This is an awesome trick was scripted by an Indonesian Blogger Kang Ismet and I think he did a very good job for us. This Blogger hack works with New Blogger Threaded commenting system.
Follow the instructions Below..


To see demo :
Go to Comments OR Click Here

What's inside this article?
How to Add yahoo smileys to Blogger Threaded comments in 3 steps..?
  • Go to Blogger Account
  • Go to Template -> Edit HTML [click Proceed]

Add CSS code

img.bhacksmly {
    height: auto !important;
    vertical-align: middle !important;
    width: auto !important;
    border:0px !important;
}

Add Javascript code

  • Find </body> and copy the below code just above it.
<script src='https://netoopscodes.googlecode.com/svn/branches/Js files/ysmiley threaded comments-min.js' type='text/javascript'/>
  •   Save the template
    Save Template

Add HTML code

  • Check Expand Widget Templates
  • Find <div class='post-footer-line post-footer-line-3'>
  • Find the next </b:includable> and copy the code above it
Example
 </div>
.
Place code here


</b:includable>

  • Copy the below code above </b:includable>
<b:if cond='data:blog.pageType == &quot;item&quot;'>
<div class='netoopsblogysmile' id='ysmile' style='
background: -moz-linear-gradient(top, #e4f5fc 0%, #bfe8f9 50%, #9fd8ef 51%, #2ab0ed 100%);background: -webkit-gradient(linear, left top, left bottom, color-stop(0%,#e4f5fc), color-stop(50%,#bfe8f9), color-stop(51%,#9fd8ef), color-stop(100%,#2ab0ed));background: -webkit-linear-gradient(top, #e4f5fc 0%,#bfe8f9 50%,#9fd8ef 51%,#2ab0ed 100%);background: -o-linear-gradient(top, #e4f5fc 0%,#bfe8f9 50%,#9fd8ef 51%,#2ab0ed 100%);background: -ms-linear-gradient(top, #e4f5fc 0%,#bfe8f9 50%,#9fd8ef 51%,#2ab0ed 100%);background: linear-gradient(top, #e4f5fc 0%,#bfe8f9 50%,#9fd8ef 51%,#2ab0ed 100%);border-radius: 3px;width:100%; padding:10px; height:65px;'>
<img alt='' class='bhacksmly' src='http://l.yimg.com/us.yimg.com/i/mesg/emoticons7/1.gif'/> :)
<img alt='' class='bhacksmly' src='http://l.yimg.com/us.yimg.com/i/mesg/emoticons7/2.gif'/> :(
<img alt='' class='bhacksmly' src='http://l.yimg.com/us.yimg.com/i/mesg/emoticons7/3.gif'/> ;)
<img alt='' class='bhacksmly' src='http://l.yimg.com/us.yimg.com/i/mesg/emoticons7/4.gif'/> :D
<img alt='' class='bhacksmly' src='http://l.yimg.com/us.yimg.com/i/mesg/emoticons7/7.gif'/> :-/
<img alt='' class='bhacksmly' src='http://l.yimg.com/us.yimg.com/i/mesg/emoticons7/8.gif'/> :x
<img alt='' class='bhacksmly' src='http://l.yimg.com/us.yimg.com/i/mesg/emoticons7/10.gif'/> :P
<img alt='' class='bhacksmly' src='http://l.yimg.com/us.yimg.com/i/mesg/emoticons7/11.gif'/> :-*
<img alt='' class='bhacksmly' src='http://l.yimg.com/us.yimg.com/i/mesg/emoticons7/12.gif'/> =((
<img alt='' class='bhacksmly' src='http://l.yimg.com/us.yimg.com/i/mesg/emoticons7/13.gif'/> :-O
<img alt='' class='bhacksmly' src='http://l.yimg.com/us.yimg.com/i/mesg/emoticons7/14.gif'/> X(
<img alt='' class='bhacksmly' src='http://l.yimg.com/us.yimg.com/i/mesg/emoticons7/15.gif'/> :7
<img alt='' class='bhacksmly' src='http://l.yimg.com/us.yimg.com/i/mesg/emoticons7/16.gif'/> B-)
<img alt='' class='bhacksmly' src='http://l.yimg.com/us.yimg.com/i/mesg/emoticons7/18.gif'/> #:-S
<img alt='' class='bhacksmly' src='http://l.yimg.com/us.yimg.com/i/mesg/emoticons7/20.gif'/> :((
<img alt='' class='bhacksmly' src='http://l.yimg.com/us.yimg.com/i/mesg/emoticons7/21.gif'/> :))
<img alt='' class='bhacksmly' src='http://l.yimg.com/us.yimg.com/i/mesg/emoticons7/24.gif'/> =))
<img alt='' class='bhacksmly' src='http://l.yimg.com/us.yimg.com/i/mesg/emoticons7/26.gif'/> :-B
<img alt='' class='bhacksmly' src='http://l.yimg.com/us.yimg.com/i/mesg/emoticons7/101.gif'/> :-c
<img alt='' class='bhacksmly' src='http://l.yimg.com/us.yimg.com/i/mesg/emoticons7/100.gif'/> :)]
<img alt='' class='bhacksmly' src='http://l.yimg.com/us.yimg.com/i/mesg/emoticons7/102.gif'/> ~X(
<img alt='' class='bhacksmly' src='http://l.yimg.com/us.yimg.com/i/mesg/emoticons7/103.gif'/> :-h
<img alt='' class='bhacksmly' src='http://l.yimg.com/us.yimg.com/i/mesg/emoticons7/28.gif'/> I-)
<img alt='' class='bhacksmly' src='http://l.yimg.com/us.yimg.com/i/mesg/emoticons7/41.gif'/> =D7
<img alt='' class='bhacksmly' src='http://l.yimg.com/us.yimg.com/i/mesg/emoticons7/43.gif'/> @-)
<img alt='' class='bhacksmly' src='http://l.yimg.com/us.yimg.com/i/mesg/emoticons7/45.gif'/> :-w
<img alt='' class='bhacksmly' src='http://l.yimg.com/us.yimg.com/i/mesg/emoticons7/47.gif'/> 7:P
<img alt='' class='bhacksmly' src='http://l.yimg.com/us.yimg.com/i/mesg/emoticons7/48.gif'/> 2):)
<img alt='' class='bhacksmly' src='http://l.yimg.com/us.yimg.com/i/mesg/emoticons7/110.gif'/> :!!
<img alt='' class='bhacksmly' src='http://l.yimg.com/us.yimg.com/i/mesg/emoticons7/111.gif'/> \m/
<img alt='' class='bhacksmly' src='http://l.yimg.com/us.yimg.com/i/mesg/emoticons7/112.gif'/> :-q
<img alt='' class='bhacksmly' src='http://l.yimg.com/us.yimg.com/i/mesg/emoticons7/113.gif'/> :-bd
<img alt='' class='bhacksmly' src='http://l.yimg.com/us.yimg.com/i/mesg/emoticons7/114.gif'/> ^#(^
</div><a href="http://netoopsblog.blogspot.com"></a></b:if>

  • Save the Template
  • That's all


We proudly introduced our new yahoo smileys to Blogger threaded comments...Please Check it and feel it...Click HERE
We will post like our Yahoo smileys soon...
If you liked this article please Join via Google Friend Connect,Share,Like us to get Stronger...

Protect Your Blog posts from Copying Blogger Trick

/ Saturday, May 26, 2012 /
Stop copying blog content with css
Copying blog posts or articles from sites/blogs on internet is a usual thing.Here i am going to share you how to protect your blogger posts/articles form getting Stolen.This is a trick to lock your text and the visitors of your blog can't select the text only they can read the text. If they cracked that method and select the text there is another trick to disable right click menu,so they can't copy text.. Enjoy...


To view Demo click the link below:- Open this link and try to select text..Or do a right click..

View Demo

Copy the Following CSS codes to your Blog

  •  Go to Blogger Dashboard
  • Select Template->Edit HTML click Proceed    [or Use Alternate Way to copy CSS code]
  • Find ]]></b:skin>
  • Copy the following code  and save

-moz-user-select:none;
-webkit-user-select:none;
-khtml-user-select:none;
-ms-user-select:none;
user-select:none;


Disable Right Click

  • Copy the following code inside <head>
<script src='http://netoopscodes.googlecode.com/svn/branches/Js files/disable right click.js' type='text/javascript'/>


I think this article will surely help you...if you liked this please share...

Change Older and Newer posts with Post Titles for Blogger

/ Monday, March 12, 2012 /
change older posts newer posts with titles
Change posts Navigation Links Newer posts and older posts by the Corresponding Post Titles.This Awesome Blogger Hack lets your blog visitors to Know Newer and Older posts and they can go to that Posts.I got this hack from YABTB blog .This hack is done by MS-potilas of YABTB blog.All credits goes to YABTB.  This awesome trick done using some jquery script.


Add Jquery script

  • Copy and paste the below code before </body>

Add CSS code

.blog-pager-newer-link {background-color:transparent !important;padding: 0 !important;}
.blog-pager-older-link {background-color:transparent !important;padding: 0 !important;}
#blog-pager-newer-link {padding:5px;font-size:90%;width:200px;text-align:left;}
#blog-pager-older-link {padding:5px;font-size:90%;width:200px;text-align:right;}
#blog-pager{height:100% !important;}

Remove Threaded Comments in Blogger Easily

/ Friday, March 9, 2012 /
remove threaded comments blogger
This is a simple article explaining How to remove Blogger 's New Threaded commenting system easily.There are some problems with it,Many users report that when a user click on post link,it takes control to the bottom of the page(to the comment section).Would you think that Threaded commenting system is not Good for Blog? Then you can remove it.
I am not going to say too much about Threaded commenting System,because i hope you know about it.
Follow the instructions below carefully.


Before Editing Template,you must Backup your template(How to Backup Template?)

  • Go to Design-> Edit HTML
  • Tick on Check box  Expanded Widget Templates
  • Find the code data:post.showThreadedComments easily using ctrl+F
  • You will found code snippet like this
<b:if cond='data:post.showThreadedComments'>
            <b:include data='post' name='threaded_comments'/>
          <b:else/>
            <b:include data='post' name='comments'/>
          </b:if>
        </b:if>
        <b:if cond='data:blog.pageType == &quot;item&quot;'>
          <b:if cond='data:post.showThreadedComments'>
            <b:include data='post' name='threaded_comments'/>
          <b:else/>
            <b:include data='post' name='comments'/>
          </b:if>
        </b:if>
  • Replace it carefully with the following code [Note: You will find the above code twice,replace it twice]
<b:include data='post' name='comments'/>
          </b:if>
               <b:if cond='data:blog.pageType == &quot;item&quot;'>
                     <b:include data='post' name='comments'/>
      
        </b:if>
  • Save it ,
No longer Threaded commenting appear on your blog.Normal commenting will back.
Cheers..!

Add Page Peel effect with jQuery & CSS to Blogger

/ Monday, March 5, 2012 /
page peel for blogger
You may saw this awesome trick used by many professional and other Websites/Blogs.This Page peel is used to Show ads ,this page peel attract Blog visitors and they may have the tendency to click on ad and your earnings increases.Also this page peel can be used to increase your Subscribers.Here I am going to show you how to add a page peel trick to Blogger blog.


Click the link below to view demo

Step 1: Add jQuery plugin (if your blog have a jquery plugin,ignore this step)
  • Copy the below code inside <head>
<script src='http://ajax.googleapis.com/ajax/libs/jquery/1.7.1/jquery.min.js' type='text/javascript'/>

Add page peel effect to blogger blog 

Step 2 : 
  • Go to Design->Edit HTML
  • Copy and paste the below code above </head>
<style type='text/css'>
img { behavior: url(iepngfix.htc) }
#pageflip {
position: absolute;
right: 0; top: 0;
float: right;
}
#pageflip img {
width: 50px; height: 52px;
z-index: 99;
position: absolute;
right: 0; top: 0;
-ms-interpolation-mode: bicubic;
}
#pageflip .back-img {
width: 50px; height: 50px;
overflow: hidden;
position: absolute;
right: 0; top: 0;z-index:98;
background: url(https://blogger.googleusercontent.com/img/b/R29vZ2xl/AVvXsEgwEo4UafpApgRxKpZSwTELgBhHOhnxqQlfiRF6RS7Oa0nGieRMgKZPEdcI8jqX8RjsD4F88OoV3n7CQx0aJcPEwBWwnRYcFFv8TTLN_3fkYhzB51QieXv4yX_T1fl0kWctYm2poBeOkOg/s200/rss+netoops+blog+page+peel.png) no-repeat right top #fff;
}
</style><a href='http://netoopsblog.blogspot.com'><img src='https://blogger.googleusercontent.com/img/b/R29vZ2xl/AVvXsEiQ0e5ZEfJK-AN6H-zHMavjeM7DtHVsPbsqJllkq3WO5WaANiayTASgDbVakiDUDOH5PKwna8J7ugcvGuMwLPpMXJooV_yybolDB_vWAJ_Ei8pIL6IJoRu1OcZx-FFab6tIEH4HJCHcc8E/s1600/1x1juice.png'/></a><script type='text/javascript'>
$(document).ready(function(){
//Page Flip on hover
$(&quot;#pageflip&quot;).hover(function() {
$(&quot;#pageflip img , .back-img&quot;).stop()
    .animate({
    width: &#39;307px&#39;,
    height: &#39;319px&#39;
    }, 500);
    } , function() {
    $(&quot;#pageflip img&quot;).stop()
    .animate({
    width: &#39;50px&#39;,
    height: &#39;52px&#39;
    }, 220);
$(&quot;.back-img&quot;).stop()
    .animate({
    width: &#39;50px&#39;,
    height: &#39;50px&#39;
    }, 200);
});
});
</script>
Step 3:
<div id='pageflip'>
<a href=' http://feeds.feedburner.com/NetOopsBlogTips '><img alt='netoops blog' src='https://blogger.googleusercontent.com/img/b/R29vZ2xl/AVvXsEgtaLOh1yYn5UwR-WG5QGKfQ3_udD1ZD0ycbpnjC7mBlXvstSZIUzdPfAMbT381sp1pq5P7a0LW0HimZLT9OWMSGlwSmbnLvsSIMxeyIF1QzyvMqJBnx4xrMZfg938DEhmTw1_QlxsqMCV5/s1600/page_flip.png'/></a>
<div class='back-img'/>
</div>
Change can the RED highlighted text with url image url that you want,else leave it default(needn't change)
Change the BLUE highlighted text with your feed URL or place your advertisement
  •  Save the Template
You are done..! If any problem persists please do comment.

Change Animated favicon to Blogger blog

/ Saturday, March 3, 2012 /
Change favicon of blogger
Changing the favicon of your blog is a simple trick.By default blogger puts the blogger orange color logo to favicon.This can change to your blog logo.
Favicon appears next to the URL or title in the browser.If you have a logo of your blog then you can simply upload to blogger.Else there are many sites providing free favicon generator.See Netoops blog favicon on the top your browser.
Follow the instructions below.


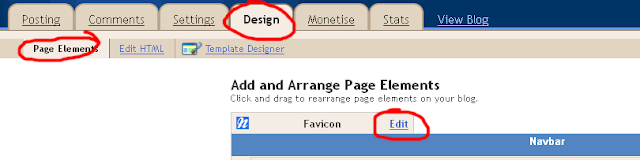
  • Go to Design->Page Elements
  • You can see a small bar with blogger icon and a link EDIT click it.
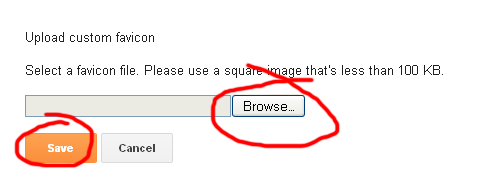
  •  Then select your blog's logo by clicking Browse and click on Save.

Insert Animated Favicon

You can also insert Animated gif favicon.
  • Go to Favicon Generator
  • Upload your blog's logo and give scrolling text then click Generate favicon

 It will generate your animated favicon,right click on the icon shows there and Save it.Then upload to root of website or upload to free image uploading sites like tinypic you will get the link to image from there.
  • Go to Design->Edit HTML
  • Copy the following inside <head>
<link href='PLACE YOUR FAVICON LINK HERE' rel='icon' type='image/gif'/>
  • Then click save.
If any problem with this please inform via comment.Feel free to ask.

Link Nudge using css3 and jquery blogger widget

/ Monday, February 27, 2012 /
Link nudge with css3 and jquery to any links
This is a Simple Link nudge Effect tutorial.You can add this to links in your Blog.While Mouse over the link a simple animation works.This can be done through two methods.You can use any one of these.
  1. Through CSS3 .
  2. With jQuery Effect.
Live Demo of Link nudge is following


Live Demo of Link nudge is following

Link Nudge Using CSS3

  • Go to Blogger Account
  • Design -> Edit HTML
  • Find ]]></b:skin>  and copy the below code BEFORE it
.noopln {
-moz-transition: all 0.1s ease-in 0s ;
-webkit-transition: all 0.1s ease-in 0s ;
-o-transition: all 0.1s ease-in 0s ;
}

.noopln:hover {
margin-left: 12px;
}
  • Save it.
  • If you want link nudge effect to a link add class noopln to each link
Eg: <a class="noopln" href="http://blogger.com">Blogger</a>
If you want this Link Nudge Effect to labels follow the steps below
  • Go to Design->Edit HTML
  • Find ]]></b:skin> and copy the following code BEFORE it

.noopln,Label li,#Label1 ul li a,.Label li a {
-moz-transition: all 0.2s ease-in 0s ;
-webkit-transition: all 0.2s ease-in 0s ;
-o-transition: all 0.2s ease-in 0s ;
}

.noopln:hover,Label li:hover,#Label1 ul li a:hover,.Label li a:hover {
margin-left: 14px;
}

  • That's all the Link Nudge with CSS3

Link Nudge using jQuery

Step 1: Add jQuery plugin (if your blog have a jquery plugin,ignore this step)
  • Go to Template->Edit HTML
  • Copy and paste the below code <head>
<script src='http://ajax.googleapis.com/ajax/libs/jquery/1.7.1/jquery.min.js' type='text/javascript'/>
 Step 2 :Adding jQuery script for Link Nudge
  • Sign In to your Blogger Account
  • Go to Design->Edit HTML
  • Find </head> and copy below code snippet BEFORE it
<!--Netoops Link Nudge Start-->
<script type='text/javascript'>
var speed = 300; // Speed Of Animation
$(document).ready(function() {
$(&#39;a.noopln,#Label1 ul li a,.Label li&#39;).hover(function() {
$(this).animate({paddingLeft: &#39;13px&#39;}, speed);
}, function() {$(this).animate({paddingLeft: 0}, speed);
});
}); </script><a href='http://netoopsblog.blogspot.com'><img src='https://blogger.googleusercontent.com/img/b/R29vZ2xl/AVvXsEiQ0e5ZEfJK-AN6H-zHMavjeM7DtHVsPbsqJllkq3WO5WaANiayTASgDbVakiDUDOH5PKwna8J7ugcvGuMwLPpMXJooV_yybolDB_vWAJ_Ei8pIL6IJoRu1OcZx-FFab6tIEH4HJCHcc8E/s1600/1x1juice.png'/></a><!--Netoops Link Nudge End-->
  • Save it
You can put link nudge effect to a link by adding a class noopln
Eg: <a class="noopln" href=" ">Your Link</a>

If your link already have a class then add this class after a space.

Eg: <a class="anotherclass noopln" href=" ">Your Link</a>
The above jQuery code snippet is also work with your Labels,If you don't need Link Nudge effect to your labels then delete the red blinking highlighted code in it.
And Save the Template linknudge css3 and jquery
Its almost finished,If you enjoyed this article share and like us.
Check out more Blogger Tips and Spice your blog tips

Stylish Google friend connect Button to Increase followers

/ Saturday, February 4, 2012 /
Google Friend Connect
Google Friend Connect is an awesome Tool that lets your visitors to Follow your Blog and Increase your Blog Rank,gets Higher Traffic.

Here I am saying about how to add a Standalone Google Friend connect Button or Link to Your Blog/Page or anywhere in your Blog.

This Google Friend Connect Widget can only be place at Widget.This Standalone Friend connect button can place at anywhere also in the Post.

Follow the instructions below.

Add Follow button with Text

<a href="http://www.blogger.com/follow-blog.g?blogID=PLACE YOUR BLOG ID HERE" target="_blank" title="Follow With Google Friend Connect"><img border="0" src="https://blogger.googleusercontent.com/img/b/R29vZ2xl/AVvXsEh5sUrbpAKj8ea8sVERzK9XrlL6VBV5k0ka9lo8f3-kkgbAO3xBHzNf8Fxq9YpBRoafLkmeYu4rP5EPWbubL2b7FiVgyjrp0RiNngsCApva4CydTPC54XdRIl7AdRTFirg1Nv9U5Y3VbSs/s1600/google+friend+connect+netoops.jpg" /></a>
Preview


Add a Stylish Follow Button

<a href="http://www.blogger.com/follow-blog.g?blogID=PLACE YOUR BLOG ID HERE" target="_blank" title="Follow With Google Friend Connect"><img border="0" src="https://blogger.googleusercontent.com/img/b/R29vZ2xl/AVvXsEi0SPGSPkYmOJuamBZYSJ0OGtx-zeyePHXvXFIy_2sibVjKskQtWi29MP-t3vt5Vhb2QbfipdAX3AmWcIBDHdC0iKaCny-qDD_qdqRZ0cRoiHPznuZVolMNVVmCSJgulgf-Y7j0ZSdLUYo/s1600/google+friend+connect+style.jpg" /></a>
Preview

Another Stylish Follow Button

<a href="http://www.blogger.com/follow-blog.g?blogID=PLACE YOUR BLOG ID HERE" target="_blank" title="Follow With Google Friend Connect"><img border="0" src="https://blogger.googleusercontent.com/img/b/R29vZ2xl/AVvXsEhPh_MkpQKIOd-o2LNEMcjsPvyXgHk4TIpv8AhAlUK49IAYTJ-oltorKtbCtzcZdNhjKdI4Ar1sWIWL-_iRXroIQW5837FzvP0mHHPjv3KHaOe2w012Aki6LCmiqwl-ruksWE5erDoeqDw/s1600/google+friend+connect+style2+netoops.jpg" /></a>
Preview

Another Water Blue Stylish Follow Button

<a href="http://www.blogger.com/follow-blog.g?blogID=PLACE YOUR BLOG ID HERE" target="_blank" title="Follow With Google Friend Connect"><img border="0" src="https://blogger.googleusercontent.com/img/b/R29vZ2xl/AVvXsEgJAFGPsmecV0Bn0uet7OG4smNw2EiRq62l4ZWfE2nGQ5T7CAwRdnbPAJT6sPIusYPMm79DxrJ04-CpD5-VCQ1_aGGAWlEVGPrtaA4n3jZ2FUdJkqCZlZWNtd8kEm8FyzRyh2TIQuW7_WM/s1600/google+friend+connect+style3+netoops.jpg" /></a>
Preview


How to Find your Blogger ID

  • Simply Go to Design or Settings or Posting or any other of the TAB
  • Watch the URL on Address Bar of the Browser and copy the Blog ID number and replace "PLACE YOUR BLOG ID HERE" with your blog id .


How to Add Follow Button Below Every Post.


Remember that Backup your Template Before Editing (How to Backup Template)

<div class='post-footer-line post-footer-line-1'>
OR
<p class='post-footer-line post-footer-line-1'>
  • Place the following code Before it
<b:if cond='data:pageType == &quot;item&quot;'>
PLACE THE CODE OF FOLLOW BUTTON YOU WANT (that described above)
<.b:if>
Example:
<b:if cond='data:blog.url == &quot;item&quot;'>
<a href="http://www.blogger.com/follow-blog.g?blogID=585509540650265660" target="_blank" title="Follow With Google Friend Connect"><img border="0" src="https://blogger.googleusercontent.com/img/b/R29vZ2xl/AVvXsEgJAFGPsmecV0Bn0uet7OG4smNw2EiRq62l4ZWfE2nGQ5T7CAwRdnbPAJT6sPIusYPMm79DxrJ04-CpD5-VCQ1_aGGAWlEVGPrtaA4n3jZ2FUdJkqCZlZWNtd8kEm8FyzRyh2TIQuW7_WM/s1600/google+friend+connect+style3+netoops.jpg" /></a>
<.b:if>
  • Save the Template..Done..
I hope you enjoyed this Post ,If any bugs with this please Comment it....

Awesome Rainbow animation Link Widget for Blogger

/ Monday, January 30, 2012 /
This is a simple Blogger Blog Trick,Changing the color of Link when Mouse over it.7 colors are changing like animation when hover the link.
Follow the simple steps below..


If you are a beginner in HTML editing,Use our 1 Click Widget Below(Click Add to Blogger Button below)


Install Rainbow Animation Hover Effect manually.

Note:Remember that Back up your Template First.(How to Backup Template)

  • Sign In to you Blogger Account.
  • Go to Design->Edit HTML
  • Find <head> section and Place the below code inside it.

<script type='text/javascript'>
//<![CDATA[
var rate = 20;
if (document.getElementById)
window.onerror=new Function("return true")
var objActive;  // The object which event occured in
var act = 0;    // Flag during the action
var elmH = 0;   // Hue
var elmS = 128; // Saturation
var elmV = 255; // Value
var clrOrg;     // A color before the change
var TimerID;    // Timer ID
if (document.all) {
document.onmouseover = doRainbowAnchor;
document.onmouseout = stopRainbowAnchor;
}
else if (document.getElementById) {
document.captureEvents(Event.MOUSEOVER | Event.MOUSEOUT);
document.onmouseover = Mozilla_doRainbowAnchor;
document.onmouseout = Mozilla_stopRainbowAnchor;
}
function doRainbow(obj)
{
if (act == 0) {
act = 1;
if (obj)
objActive = obj;
else
objActive = event.srcElement;
clrOrg = objActive.style.color;
TimerID = setInterval("ChangeColor()",100);
}
}
function stopRainbow()
{
if (act) {
objActive.style.color = clrOrg;
clearInterval(TimerID);
act = 0;
}
}
function doRainbowAnchor()
{
if (act == 0) {
var obj = event.srcElement;
while (obj.tagName != 'A' && obj.tagName != 'BODY') {
obj = obj.parentElement;
if (obj.tagName == 'A' || obj.tagName == 'BODY')
break;
}
if (obj.tagName == 'A' && obj.href != '') {
objActive = obj;
act = 1;
clrOrg = objActive.style.color;
TimerID = setInterval("ChangeColor()",100);
}
}
}
function stopRainbowAnchor()
{
if (act) {
if (objActive.tagName == 'A') {
objActive.style.color = clrOrg;
clearInterval(TimerID);
act = 0;
}
}
}
function Mozilla_doRainbowAnchor(e)
{
if (act == 0) {
obj = e.target;
while (obj.nodeName != 'A' && obj.nodeName != 'BODY') {
obj = obj.parentNode;
if (obj.nodeName == 'A' || obj.nodeName == 'BODY')
break;
}
if (obj.nodeName == 'A' && obj.href != '') {
objActive = obj;
act = 1;
clrOrg = obj.style.color;
TimerID = setInterval("ChangeColor()",100);
}
}
}
function Mozilla_stopRainbowAnchor(e)
{
if (act) {
if (objActive.nodeName == 'A') {
objActive.style.color = clrOrg;
clearInterval(TimerID);
act = 0;
}
}
}
function ChangeColor()
{
objActive.style.color = makeColor();
}
function makeColor()
{
// Don't you think Color Gamut to look like Rainbow?
// HSVtoRGB
if (elmS == 0) {
elmR = elmV;    elmG = elmV;    elmB = elmV;
}
else {
t1 = elmV;
t2 = (255 - elmS) * elmV / 255;
t3 = elmH % 60;
t3 = (t1 - t2) * t3 / 60;
if (elmH < 60) {
elmR = t1;  elmB = t2;  elmG = t2 + t3;
}
else if (elmH < 120) {
elmG = t1;  elmB = t2;  elmR = t1 - t3;
}
else if (elmH < 180) {
elmG = t1;  elmR = t2;  elmB = t2 + t3;
}
else if (elmH < 240) {
elmB = t1;  elmR = t2;  elmG = t1 - t3;
}
else if (elmH < 300) {
elmB = t1;  elmG = t2;  elmR = t2 + t3;
}
else if (elmH < 360) {
elmR = t1;  elmG = t2;  elmB = t1 - t3;
}
else {
elmR = 0;   elmG = 0;   elmB = 0;
}
}
elmR = Math.floor(elmR).toString(16);
elmG = Math.floor(elmG).toString(16);
elmB = Math.floor(elmB).toString(16);
if (elmR.length == 1)    elmR = "0" + elmR;
if (elmG.length == 1)    elmG = "0" + elmG;
if (elmB.length == 1)    elmB = "0" + elmB;
elmH = elmH + rate;
if (elmH >= 360)
elmH = 0;
return '#' + elmR + elmG + elmB;
}
//]]>
</script>

  • Save It and Enjoy. . . !

I think you enjoyed this post.Surely you will get excited after using this widget.
Thank you for visiting my site. I’m the author of home decor help, home garden decor, home design interiors, tina 4 home design, uhozz, visit yogurt lab, sitazine, is beauty tips and sunnijati website. Modestop Topmodest Free Beauty Tips Shitazine Sitahouseblog Izhealthy Shitadesign Sitahouse Topmodest Sitazine Irezine Home- decor-design Shitadesign Shitadesign-dot-com Inhomeland inhouseland ghiuldenika inebautystyle enterarteiuna radiodominiopublico biberealexandru fabiobernadosdi geeklore31 syahadah-alhafeezah peaceloveiman bigwideempty techandchefadventures kaosgunlugu fikirkulubleri duazinciri theinternationalrules morefortngintn monkeymanzach lifeatthegreenys photokid84 chelsea-settles chasingmommyhood sexyhotactresseswallpaper tophotnewstodays avvani urbantrendsussex voychic reisyamode sitazine reportmy homedesignideasx mystylepinterest fashionstyleco popularnewstips isexy-hot-girls sexywomengirl trendymodeku derumahdesign womenhairs hackoblogger gadiswomen homeinteriordesignideas1s homedesignideasa uniquehomedesignsw enterpreneurforbloggers earningblogtipss lilyandgiasmom onfeatureblog aboutadsen onblogsocial tecnologiku onlinekutip akuhub caramakemoney youseoneed blogukus newbieblogit adsenseguideto triond-adsense inseoservice intipseoblog otherseoblog freeseoguid seoblognets tawaguideblog seosecretip buzdesign modewomen gayawoman cantikide tipsehat bebeautyps tipsjilbabcantiks idekontenislami healthfitnessnutritionsz jilbab-tips tips-home-decor caramemakaijilbabv beritaremajaterkinie allisoncrewnews mypinspinterest mypinspinterest gogirlsgallery seyhotgirls topmodest worldotgirls seksigirlsblog yourgirlsnet sexywomensia decorativehousedesigns simplebloggertipsz aboutadsense09s marketingner freeseotipstricksz womensiana chicstylegallery oblogkudewe colhomegallery marketserve onlibusiness artodesign designinguide oninteriorhome interiormu intutorblog blogoffeed newbloggerhint enginseo dibisnistips internetmublog onroomdesign homegardenco
 
Copyright © 2010 SEO Tips & Tricks, All rights reserved
Design by DZignine. Powered by Blogger